Tampilkan postingan dengan label part. Tampilkan semua postingan

Sabtu, 27 Februari 2016

How To Antique Painted Furniture Part 2

     Antiquing a Swans and Roses Pine Bench
To antique paint, I use either stain or antique gold paint. Plain old water based craft paint works well. This time I am using antique gold paint because I chose a light colored paint. Antique gold looks nice on light colors. On a darker color, I would use Pecan or Walnut stain.

Use the small brush to paint the antique gold in the grooves. Do one section at a time, before the paint has time to dry, wipe each section down with the wet sponge dipped in the gold paint.  Follow the grain of the wood, leaving the amount of antiquing that you desire. The antiquing is going to take some of the brightness out of the paint, giving it an aged look. 

Dont forget to do the sides.
                          Eugenie Woodcraft
             www.etsy.com/shop/woodcraftqueen

Jumat, 26 Februari 2016

Simple woodworking Glue Screw and Cap Method Part 2

             The Glue, Screw and Cap Method     
                                      Part 2
4. Use a band saw to cut a cap  out of a 5/16" dowel.

5. Roll the cap in glue.


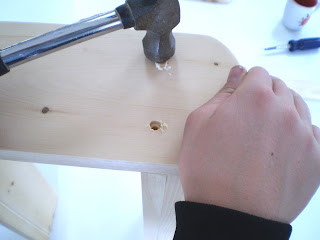
6. Tap the cap in the hole to cover the screw.
    Check out my plans on www.sawtoothideas.com  
                          Eugenie Woodcraft

Selasa, 23 Februari 2016

How to sandblast butterflies on glass Part 3

7. Use a craft knife to cut out the outline of your butterfly.

8. Carefully lift off the cut pieces. Press on the edges of the contact paper where you cut out pieces, to make sure there are no lifted edges. Bring the glass to someone who can sandblast it for you. Most glass cutters offer this service.

9. After your glass has been sand blasted, carefully pull off the contact paper. 


Sabtu, 20 Februari 2016

Tree Cupboard Part 2

                             Tree cupboard 

I have routed the inside of the cupboard door to make a place for the  etched mirror.

This is one of the two drawer fronts. I am going to carve little birds on them in keeping with the tree theme.

I have carved the two door fronts and routed the back. The doors are now ready to stain.

Eugenie Woodcraft
Beautiful furniture, made simple.

Jumat, 19 Februari 2016

Simple Woodworking Glue Screw and Cap Method Part 1


The Glue, Screw and Cap Method 
Part 1.

    
The glue screw and cap method is a simple way to build furniture that is both fast and efficient. It enables the average craft-person  to build beautiful, strong furniture with just a few tools and a simple method of building that does not require great skill, a fancy shop, or years of practice. You will not need a sea of clamps, no planer, you dont have to know what a dove tail is, or dadoes. You dont have to be particularly strong, and all you need is a weekend to make something to be proud of. I make all my furniture out of pine. Pine is easy to work with, is readily available at you town hardware store and it comes in various widths,  planed. Pine veered sheet goods are also available to make the door inserts, and you can buy panels of laminated pine to build your projects. This is why you dont need a lot of tools or a big workshop. 


1. Use a #8 countersinking drill bit to drill a hole for the screw and the cap at the same time.

2. Apply the glue on the edge.

3. Insert a #8 1 1/4" flat head screw, into the drilled hole.
        

Selasa, 16 Februari 2016

Tree cupboard part 1

                                      Tree Cupboard
This is the cupboard base. I am going to put two drawers, on the middle shelf, with a bird carved on the front of each drawer.

This is the plan I am following.

I inserted a bird, and nest, on one side.

I have wanted to build this for a while now. I am envisioning a cupboard with a tree on the door, and mirror on both sides with glass etching. I think that the mirror will make the tree stand out. This is one of my more eclectic models. I put a bird in a nest on one side, and I am going to put a another bird on the mirror.This is a work in progress. This is my progress so far.

                         Eugenie Woodcraft
              Beautiful furniture, made simple.

Minggu, 14 Februari 2016

How to sandblast butterflies on glass Part 1

Sand blasting glass is a nice way to add that special something to glass or mirror.
1. This is what you will need to sandblast glass or mirror. Plain colored contact paper. The very sticky kind is best. Dont use the easy to remove kind, it will not adhere to the glass enough.You will also need a pencil, a razor scrapper, a craft knife, window cleaner and a piece of glass or mirror. If you are having the glass cut, ask them to sand the edges so you dont cut yourself on the  sharp edges.

2. Clean the glass and cover it with the contact paper.  Carefully smooth out all of the bubbles.

3. Use a craft knife to cut off the extra contact paper..

How to sandblast butterflies on glass Part 2

4. Remove the extra contact paper around the edges.

5. Use a pencil to draw the outline of the butterfly with the stencil.. Stencils are great for sandblasting but you can also draw freehand, you just have to remember that what you cut out, is what will be sandblasted.

6. Remove the stencil to reveal the butterfly.

Kamis, 11 Februari 2016

Simple woodworking The glue Screw and Cap Method Part 3

                    The glue, screw and Cap method.
                                     Part 3.

7. Sand the caps smooth

8. A nice smooth finish.
This is one of the plans available on  Sawtooth Ideas that is made using the glue, screw and cap method.Beautiful furniture, made simple.
www.sawtoothideas.com
Eugenie Woodcraft
 

Download Woodwoking Plans Copyright © 2016-2022 -- Powered by Blogger